Building a 20TB FC SAN Target on Debian 12
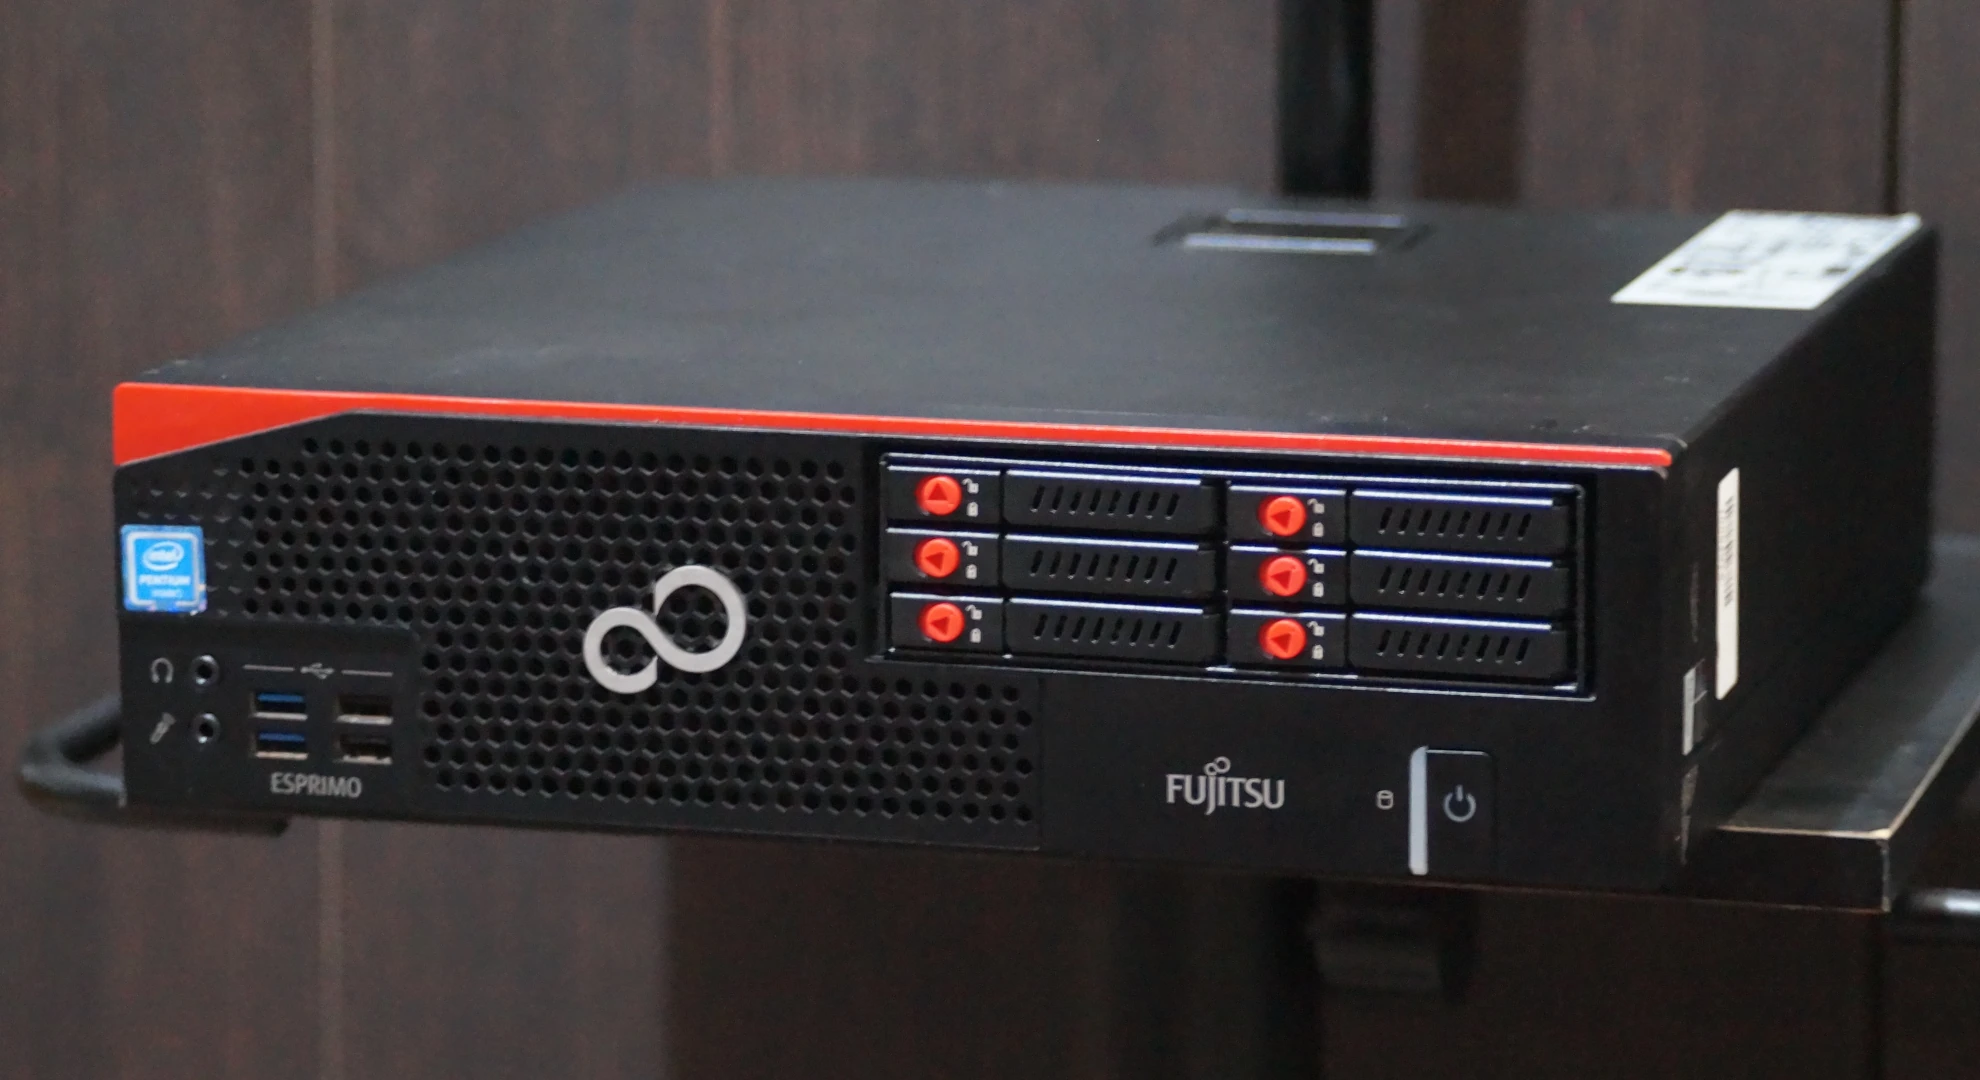
This project focuses on building a Fibre Channel (FC) Storage Area Network (SAN) target using a Fujitsu Esprimo D756 running Debian 12, along with a Dell/Qlogic HBA adapter.
The aim of this project is to design a Fibre Chanel Storage Area Network solution using consumer-grade hardware, maximizing power and heat efficiency while remaining within a tight budget and keeping noise levels low.
The project will examine various build options, evaluating their cost, performance, and power consumption. This will allow you to choose a build that best aligns with your priorities, whether it's budget, storage capacity, performance, or energy consumption.
Note:
If the primary goal is to build a more convenient storage solution, I would avoid using Fibre Channel and Storage Area Network technologies. For better power and heat efficiency, I recommend using an LSI MegaRAID SAS 9286CV-8e in your media server, connected to a JBOD (Just a Bunch of Disks) via external cables. This setup eliminates unnecessary failure points and reduces power consumption by avoiding multiple machines. With just your media server and a disk shelf, you'll be able to support up to 240 disks per LSI card.
Special mention to the NetApp DS4246 and DS2246. They are widely used in home-labs.
Most of the hardware mentioned in this guide was purchased from eBay, with some components sourced from AliExpress. Please note that shipping costs will vary depending on your location.
The documentation provided by the hardware vendors has been found online and saved locally for preservation purposes. The goal is to offer as much information as possible to assist with decision-making if you choose to build your own storage system at home. A datasheet section has been included at the bottom of the page where all the hardware specifications are provided for easy reference.
After some research about different Disk Arrays solutions that support Fibre Channel, the combined cost of the disk arrays and controllers exceeded the budget. Many disk arrays also required the use of OEM disks, further driving up the price.
Considering the high costs, along with the challenges of noise and power consumption, it became clear that enterprise hardware was far too expensive and impractical for a home office setup, especially near a sleeping area.
For this reason, the focus shifted on finding more affordable options to build an FC SAN network at home, prioritizing low noise levels and power efficiency.
With 6 x 4TB 2.5" HDDs on RAID 5, you could get up to 20 TB of usable storage.
If you spot any typos, have questions, or need assistance with the build, feel free to contact me at: antonimercer@lthjournal.com
This guide contains no affiliate links or ads. If you'd like to support this or future projects, you can do so here:
By supporting monthly you will help me create awesome guides and improve current ones.
After this brief introduction about the decision-making of the project, let's start with the installation.
Fujitsu Esprimo D756
The Fujitsu Esprimo D756 pc was selected for it low power consumption, minimal noise and affordable price on eBay. The unit came with an Intel® Pentium® G4400 processor, 4 GB of RAM and a 128 GB M.2 SATA SSD.
Despite having a proprietary motherboard form factor, it features a PCIe 3.0 x16 slot and a PCIe 2.0 x4 slot (mechanically x16), which allows for the installation of both an HBA adapter and a RAID card, although one of the cards will only use half the available PCIe lanes.
One decisive factor was the horizontal disposition of the computer. This will fit one a pane in the rack allowing less space to be used.
Before any modifications, the unit's power consumption was 28 watts, compared to 40 watts after adding all the additional hardware and 52 watts during read/write operations.
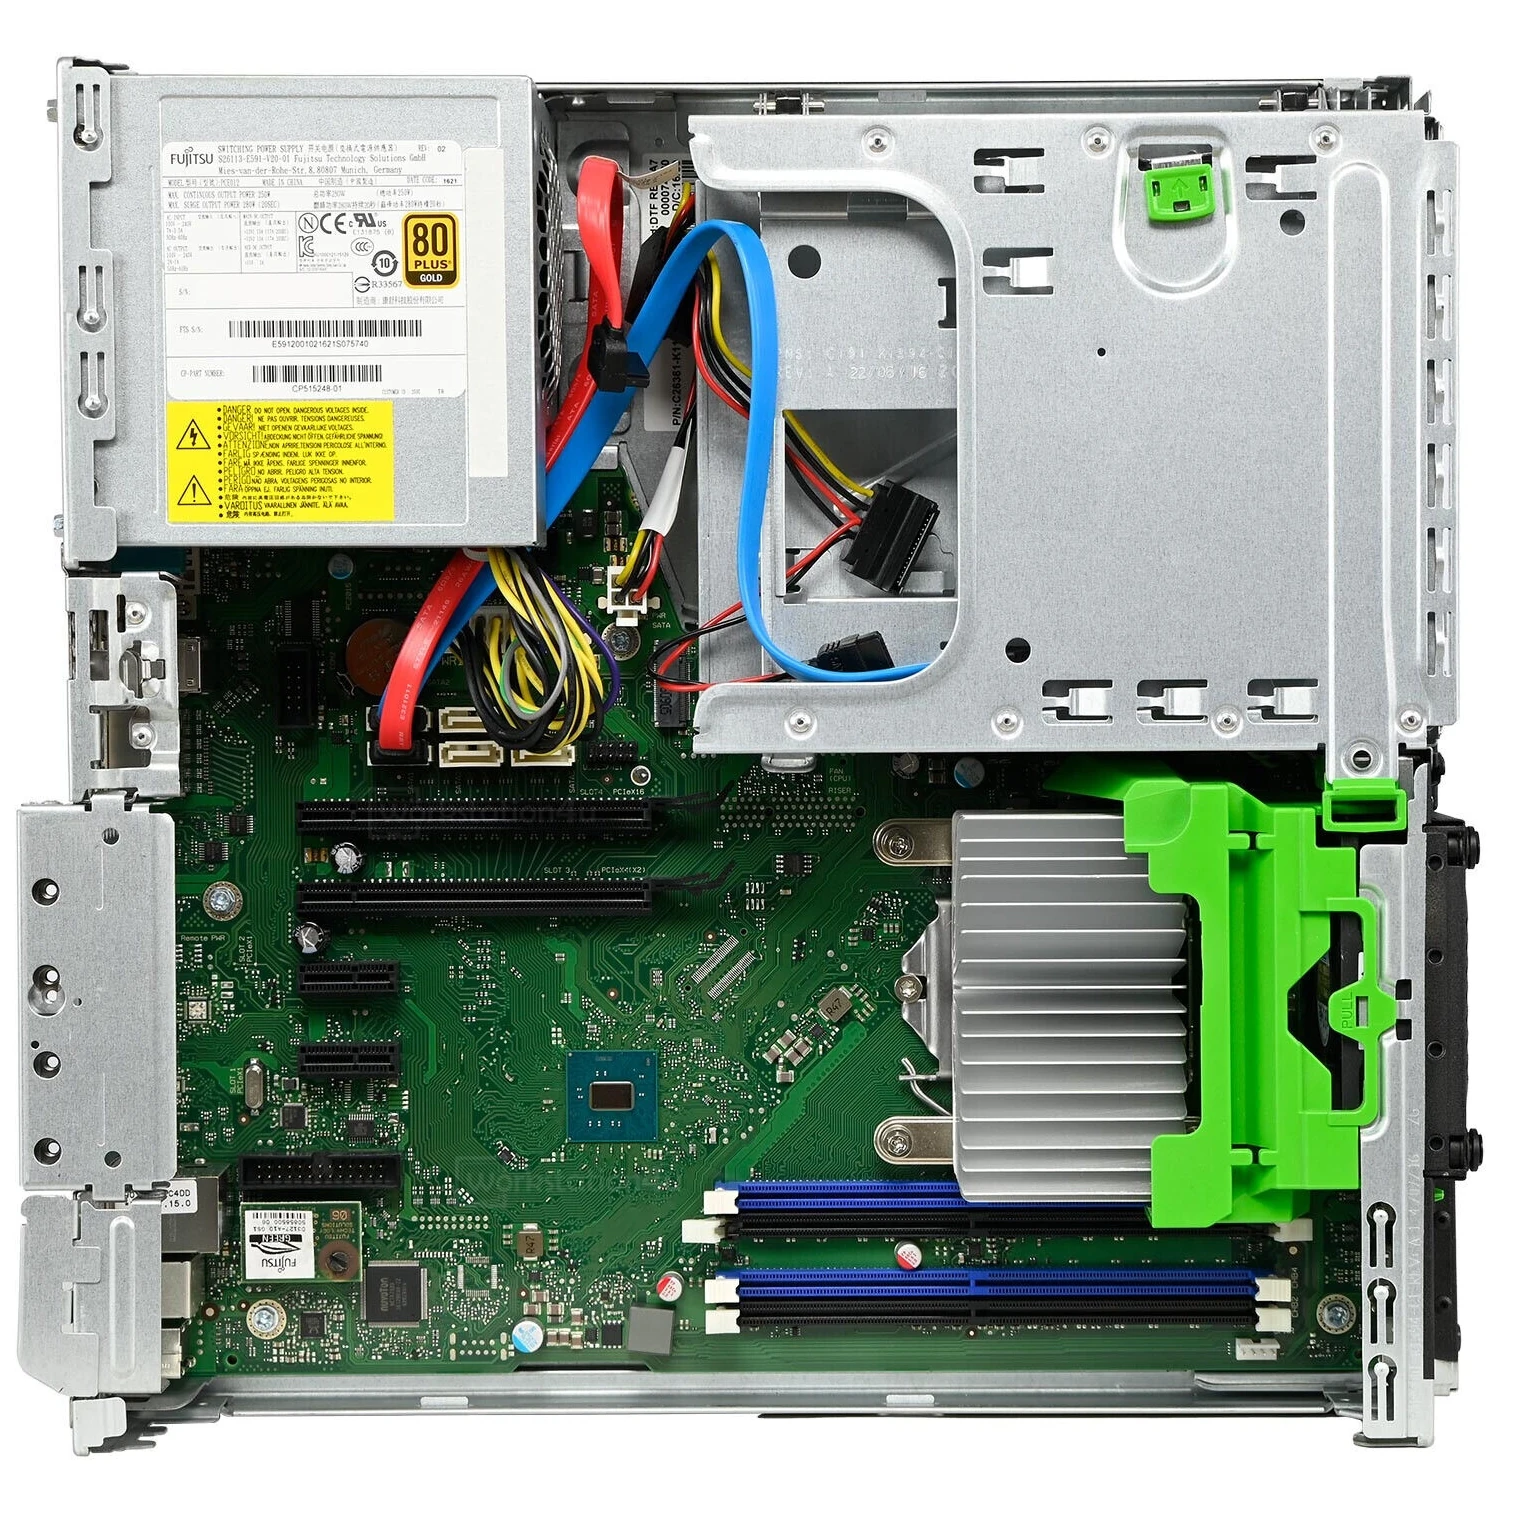
Picture of the open case.
Hot swap caddy installation
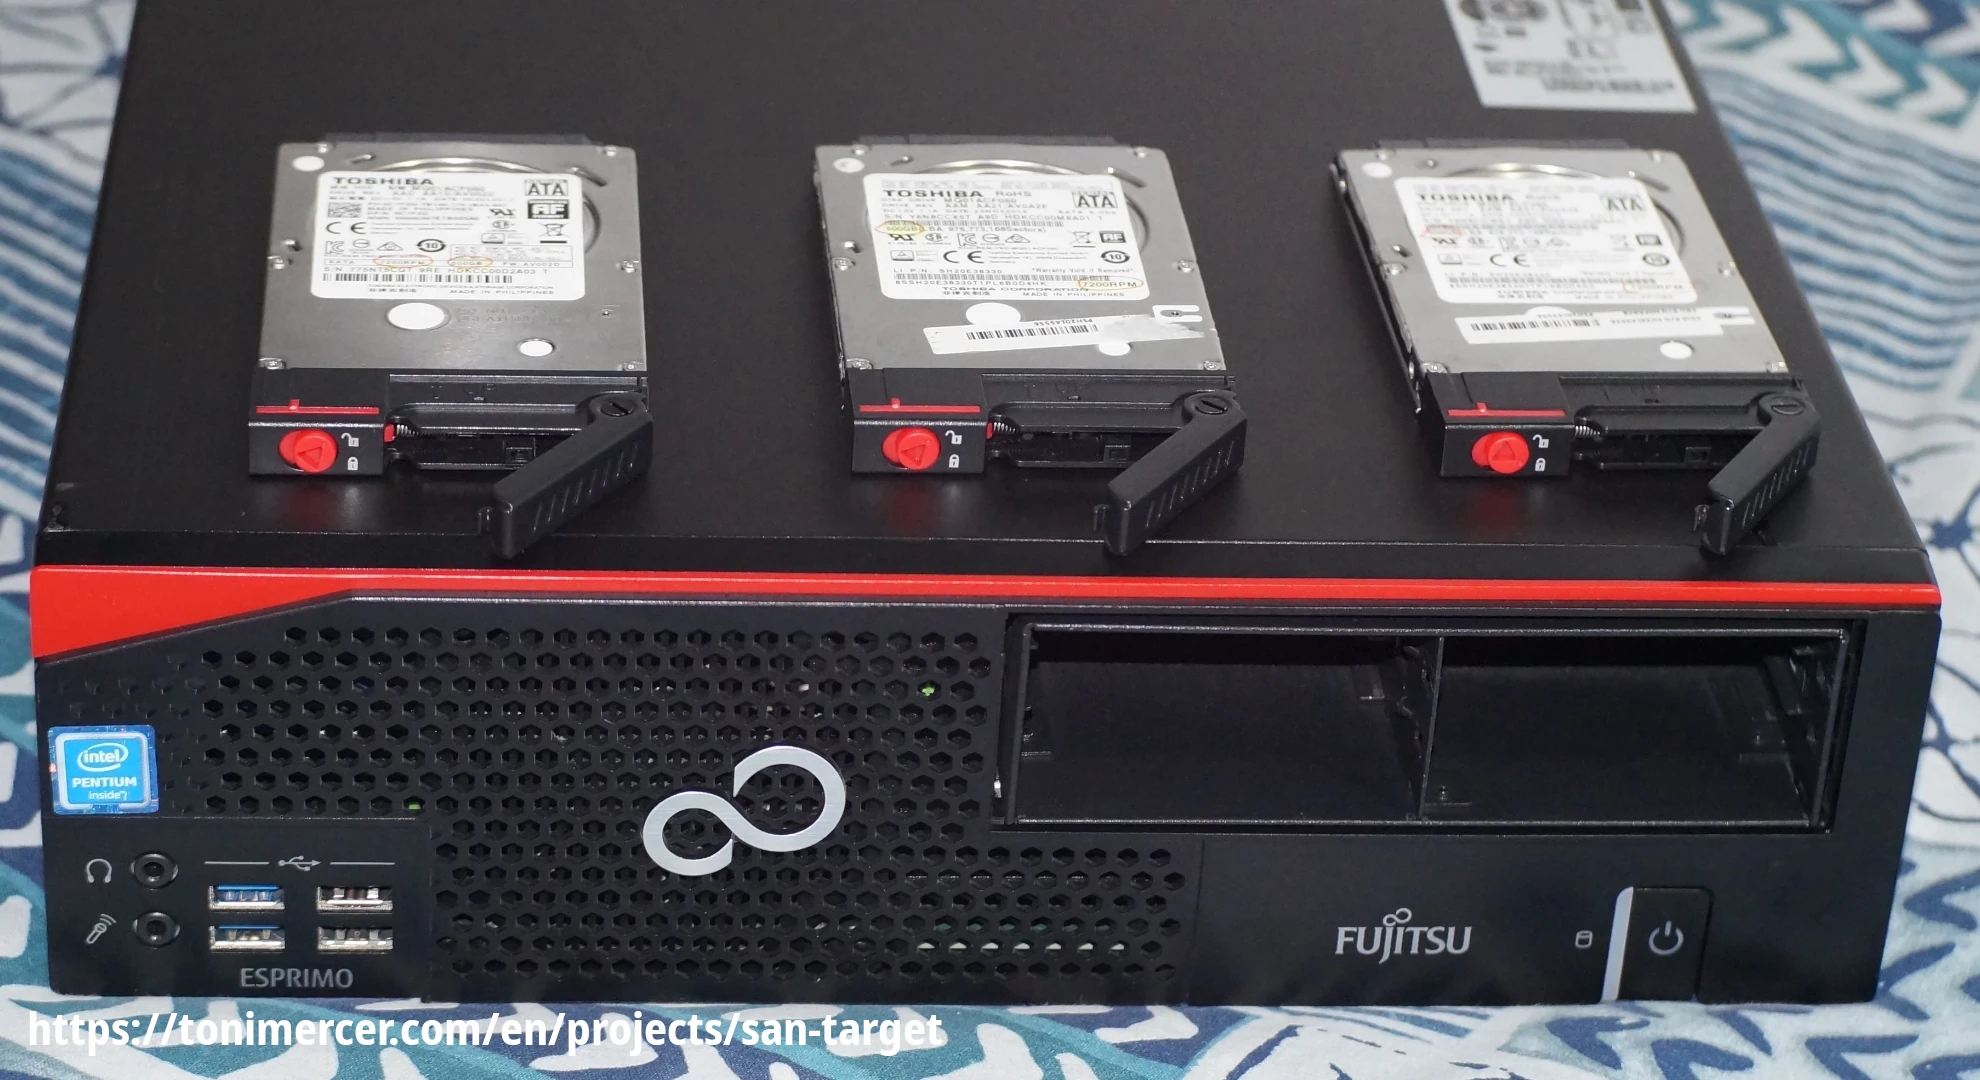
The Fujitsu has a 5.25-inch external bay, but the datasheet specifies it's intended for an optical disc drive only. Once opening the case, the optical drive can be removed easily by pulling a metal lever, but the optical drive bay is secured with rivets, which need to be drilled out.
The bay is held by a small metal piece secured with plastic to the Fujitsu case. After removing the plastic with a screwdriver, the metal can be moved, freeing the bay for easier handling.
Once the rivets are gone and the exceeding metals disposed. The hot-swap bay will be held in place by metal brackets designed to keep it secured. But to have actual bolts holding it in place, they will need to be drilled manually.
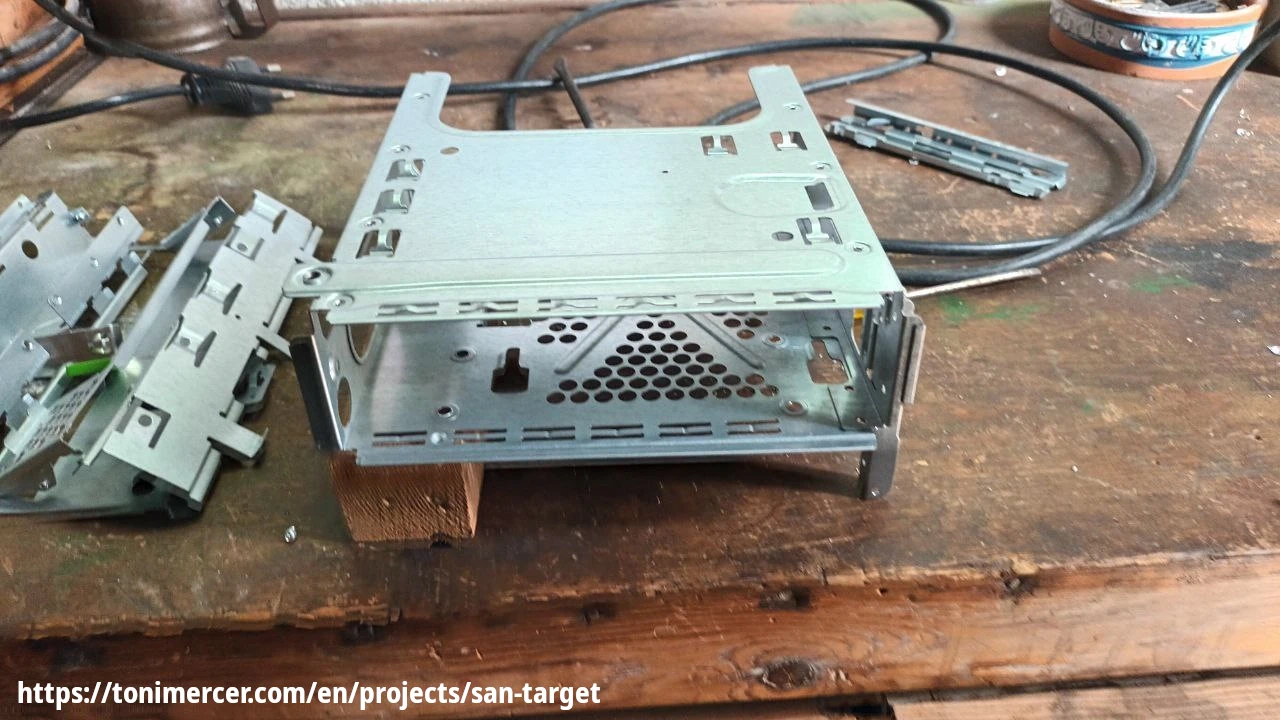
Picture after drilling all the rivets and extracting the disk drive bay.
For up to six disks, there is this OImaster hot swap case with 6 x 2.5-inch bays from Aliexpress here; a screenshot of the product for archival reasons can be found here.
This particular hot-swap case uses two Molex power connectors, while the Fujitsu Esprimo only provides two SATA power connectors. To address this, an adapter to convert the SATA power connector to Molex will be required. If it splits into two Molex, the remaining SATA power connector can be used for a seventh disk, which could be configured as a cache drive if you want to enhance the performance of the hardware RAID by adding cache.
The bolt-holes of the bay won't match the case of the D756. They have to be drilled separately and not in a standard 5.25-inch way.
The cost of the unit was 45.5 Euros with free shipping. And the power adapter was 1.17 Euro on Aliexpress
Installing the QLE2560
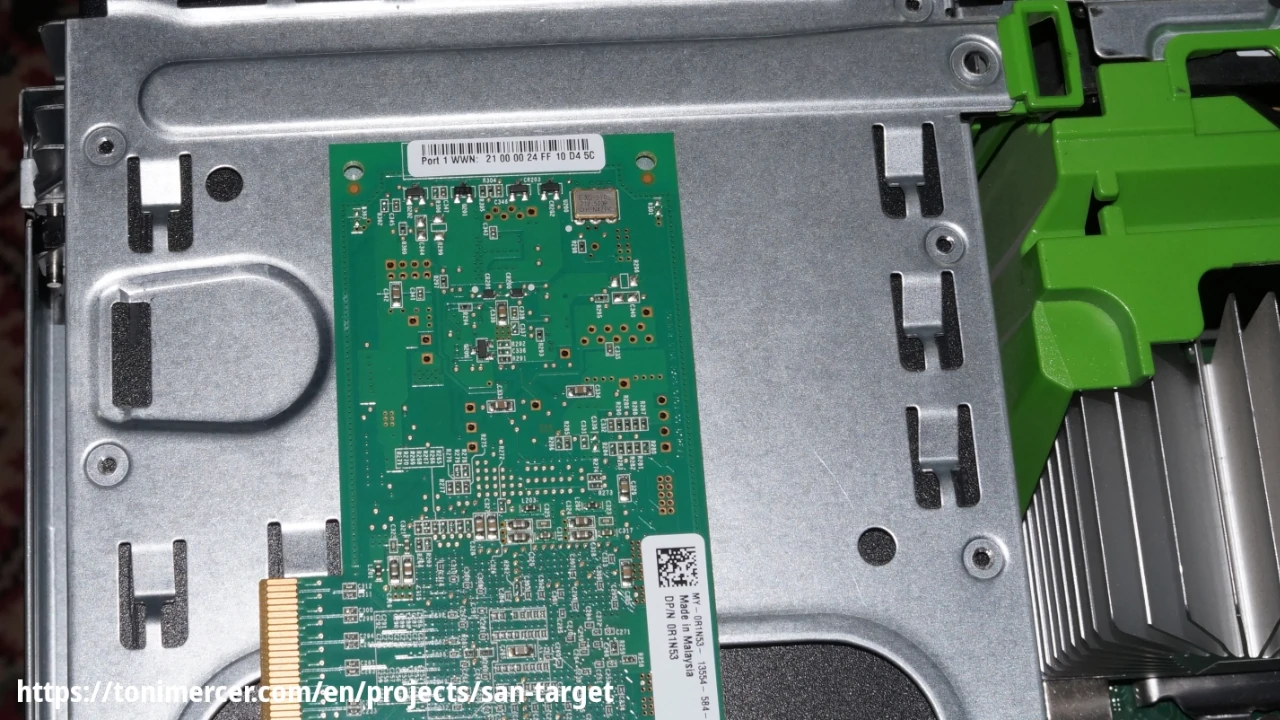
Before installing the card, locate the World Wide Name (WWN). This number can be located later using the command line.
Note:
If you install the HBA card and then set up Debian, the system will automatically install the necessary non-free firmware. This means the firmware ql2500_fw.bin for the HBA adapter will already be present on the system and loaded by the kernel during the first boot. As a result, you can skip the manual installation of the firmware package.
Debian decision to install automatically non-free firmware here.
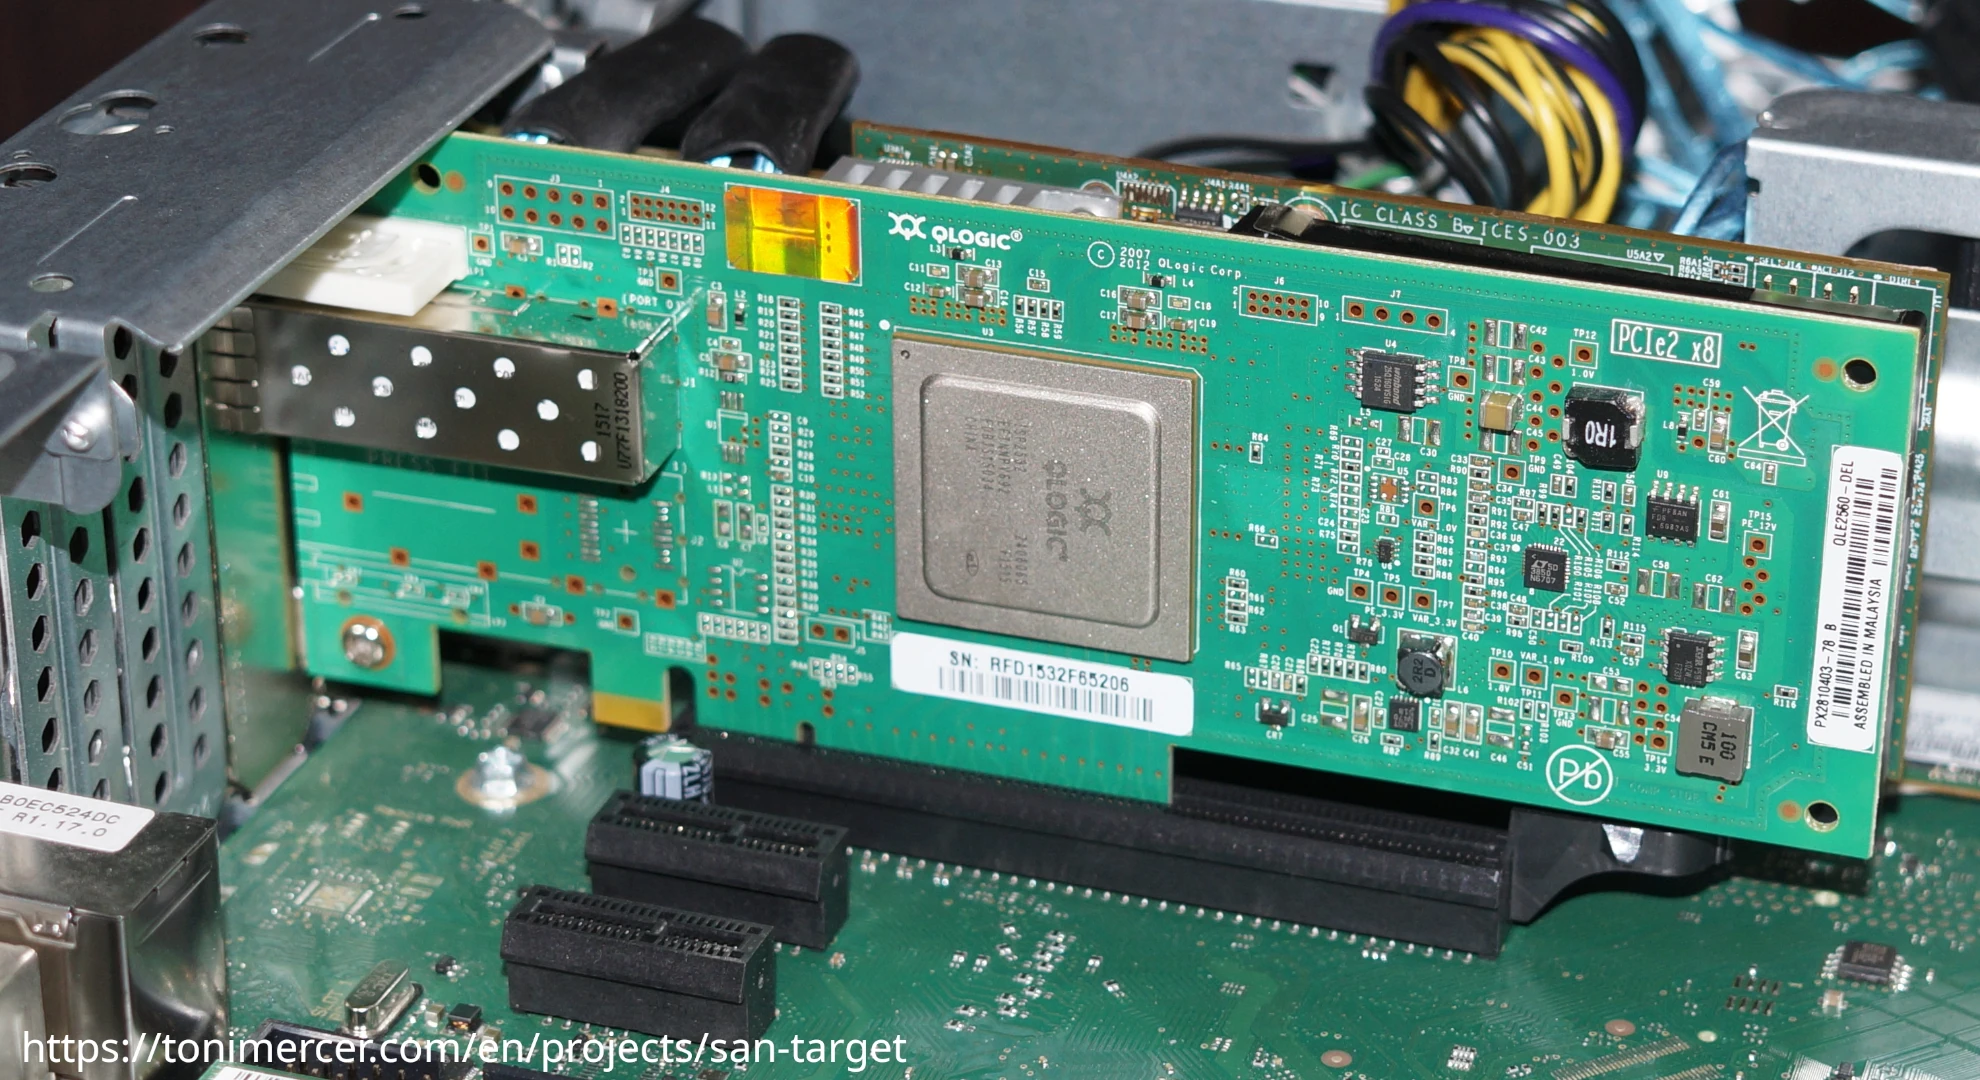
Qlogic HBA adapter
Check if the firmware is installed on the system: dmesg | grep 'qla2xxx'
[ 1.457285] qla2xxx 0000:04:00.0: firmware: failed to load ql2500_fw.bin (-2)
The firmware can't be loaded. It is located in the firmware-qlogic package:
Install it by running:
apt install firmware-qlogic
A reboot will ensure that the kernel properly loads the firmware. After rebooting, you can verify that the HBA firmware has been loaded by running dmesg | grep 'qla2xxx'
This should display output confirming that the kernel has successfully loaded the HBA firmware.
[    1.386152] qla2xxx [0000:00:00.0]-0005: : QLogic Fibre Channel HBA Driver: 10.02.07.900-k.
[    1.386247] qla2xxx [0000:04:00.0]-001d: : Found an ISP2532 irq 44 iobase 0x00000000198d5d7d.
[    1.446773] qla2xxx [0000:04:00.0]-ffff:8: FC4 priority set to FCP
[    1.465229] qla2xxx 0000:04:00.0: firmware: direct-loading firmware ql2500_fw.bin
[    2.029147] scsi host8: qla2xxx
[    2.029914] qla2xxx [0000:04:00.0]-00fb:8: QLogic QLE2560 - PCI-Express Single Channel 8Gb Fibre Channel HBA.
[    2.029924] qla2xxx [0000:04:00.0]-00fc:8: ISP2532: PCIe (5.0GT/s x8) @ 0000:04:00.0 hdma- host#=8 fw=8.07.00 (90d5).
[   23.530148] qla2xxx [0000:04:00.0]-8038:8: Cable is unplugged...
HBA as target mode
This command will output if the card initiator mode is enabled: cat /sys/module/qla2xxx/parameters/qlini_mode
enabledThe qla2xxx kernel module needs to be configured to disable initiator mode by default. To apply this change, you'll need to modify the configuration file in the modprobe.d folder. After updating the configuration, the module must be unloaded and reloaded for the change to take effect. Additionally, you'll need to update the initramfs to ensure the settings persist across reboots.
echo 'options qla2xxx qlini_mode="disabled"' > /usr/lib/modprobe.d/qla2xxx.conf
/sbin/rmmod qla2xxx
/sbin/modprobe qla2xxx
Let's see how it reloaded running dmesg | grep 'qla2xxx' command again
[    3.215209] qla2xxx [0000:00:00.0]-0005: : QLogic Fibre Channel HBA Driver: 10.02.07.900-k.
[    3.215501] qla2xxx [0000:01:00.0]-001d: : Found an ISP2532 irq 35 iobase 0x(____ptrval____).
[    3.278684] qla2xxx [0000:01:00.0]-ffff:2: FC4 priority set to FCP
[    3.295773] qla2xxx 0000:01:00.0: firmware: direct-loading firmware ql2500_fw.bin
[    3.875952] scsi host2: qla2xxx
[    3.880489] qla2xxx [0000:01:00.0]-00fb:2: QLogic QLE2560 - PCI-Express Single Channel 8Gb Fibre Channel HBA.
[    3.880514] qla2xxx [0000:01:00.0]-00fc:2: ISP2532: PCIe (5.0GT/s x8) @ 0000:01:00.0 hdma+ host#=2 fw=8.07.00 (90d5).
[   24.964620] qla2xxx [0000:01:00.0]-8038:2: Cable is unplugged...
[ 1132.532139] qla2xxx [0000:01:00.0]-b079:2: Removing driver
[ 1132.532170] qla2xxx [0000:01:00.0]-00af:2: Performing ISP error recovery - ha=0000000076c70100.
[ 1156.440604] qla2xxx [0000:00:00.0]-0005: : QLogic Fibre Channel HBA Driver: 10.02.07.900-k.
[ 1156.440866] qla2xxx [0000:01:00.0]-001d: : Found an ISP2532 irq 35 iobase 0x000000006d143eec.
[ 1156.502869] qla2xxx [0000:01:00.0]-ffff:2: FC4 priority set to FCP
[ 1156.519972] qla2xxx 0000:01:00.0: firmware: direct-loading firmware ql2500_fw.bin
[ 1157.080021] scsi host2: qla2xxx
[ 1157.083425] qla2xxx [0000:01:00.0]-0122:2: skipping scsi_scan_host() for non-initiator port
[ 1157.083609] qla2xxx [0000:01:00.0]-00fb:2: QLogic QLE2560 - PCI-Express Single Channel 8Gb Fibre Channel HBA.
[ 1157.083643] qla2xxx [0000:01:00.0]-00fc:2: ISP2532: PCIe (5.0GT/s x8) @ 0000:01:00.0 hdma+ host#=2 fw=8.07.00 (90d5).
Update the initramfs with:
/sbin/update-initramfs -uNow reboot the system and run again cat /sys/module/qla2xxx/parameters/qlini_mode ensure that it persists reboots.
disabledBefore continuing by creating the LUNs with targetcli the RAID must be configured. This will be addressed once we have the disks installed.
Installing the LSI MegaRAID SAS 9260-8i
Note:
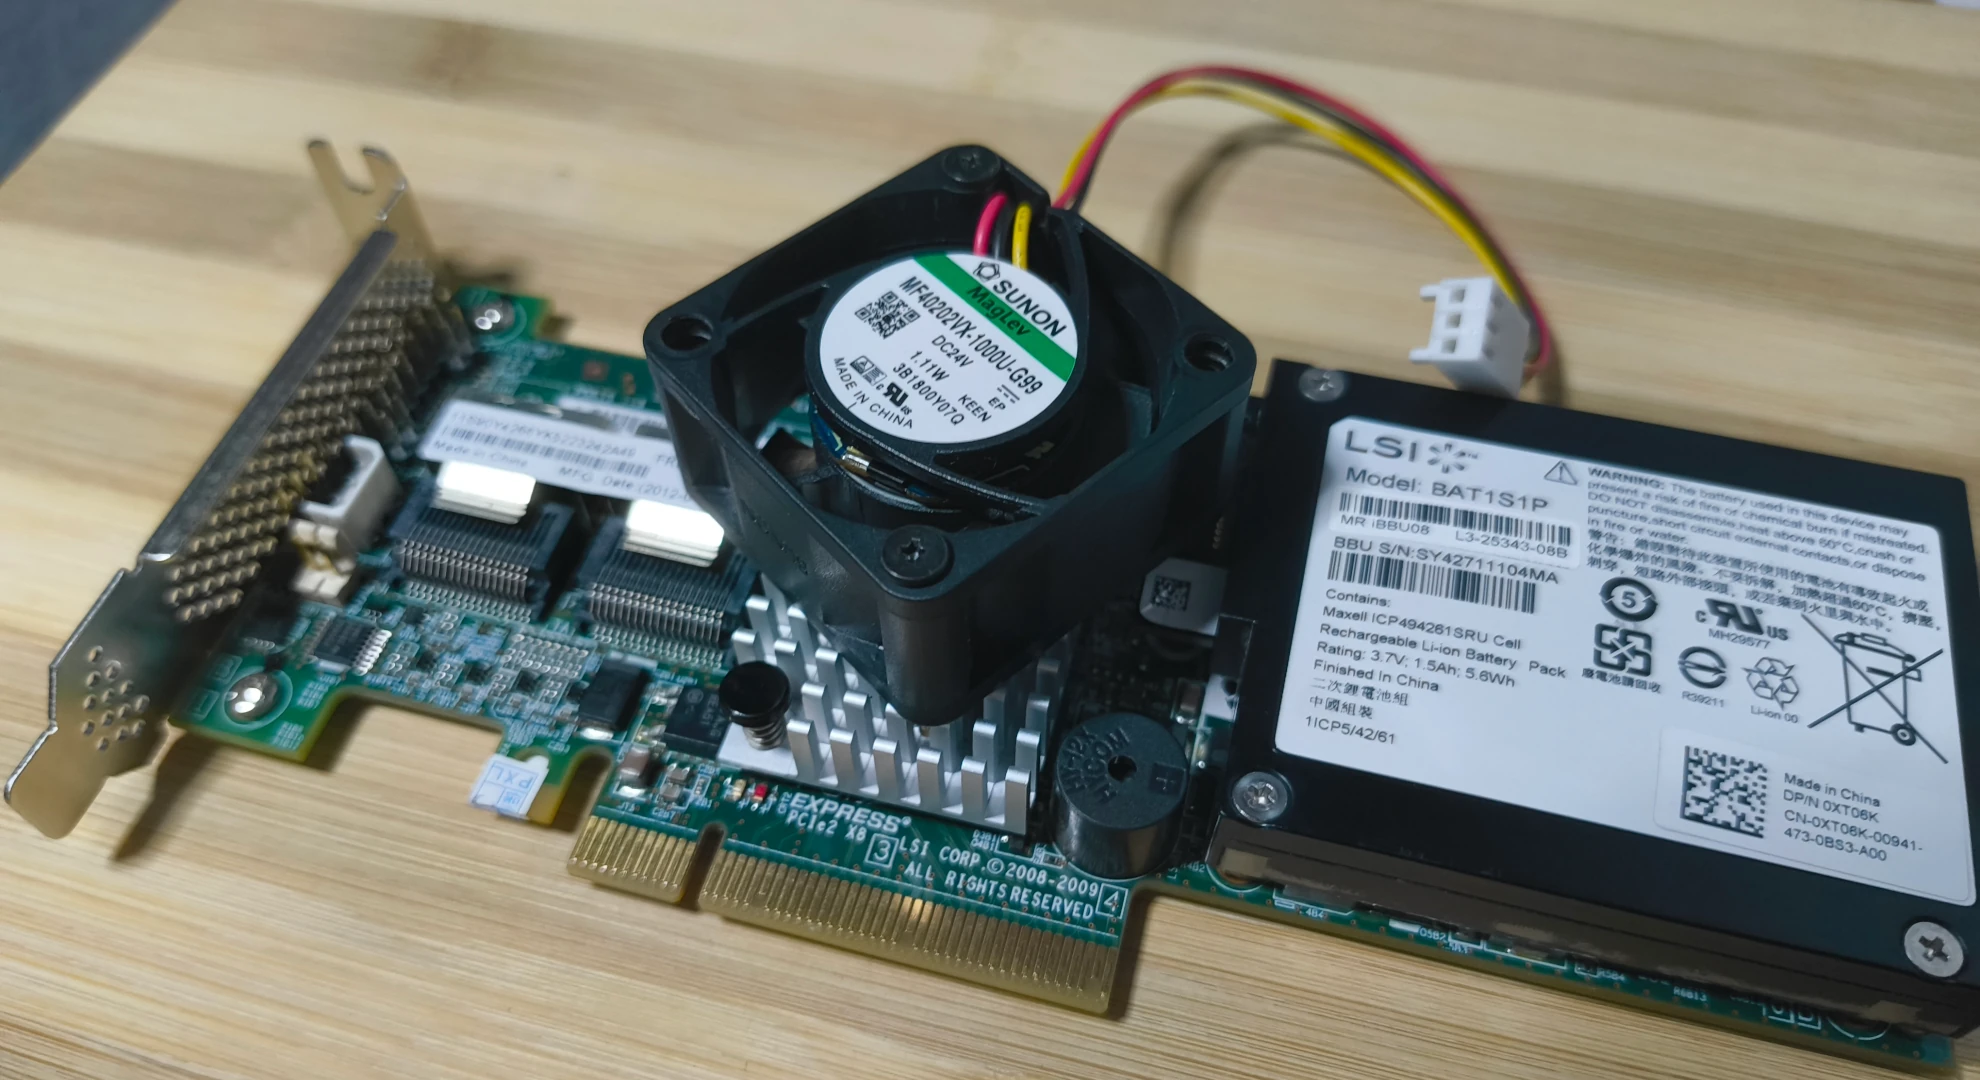
It's important to note that the LSI card will require a fan attached to the heat sink for proper cooling. As a result, it will no longer fit in the x16 PCIe slot and will need to be installed in the x4 slot instead. This placement will block access to the adjacent x1 PCIe port.
Additionally, the fan will require to be plugged to one of the sata cables that are used to power to the disk bay.
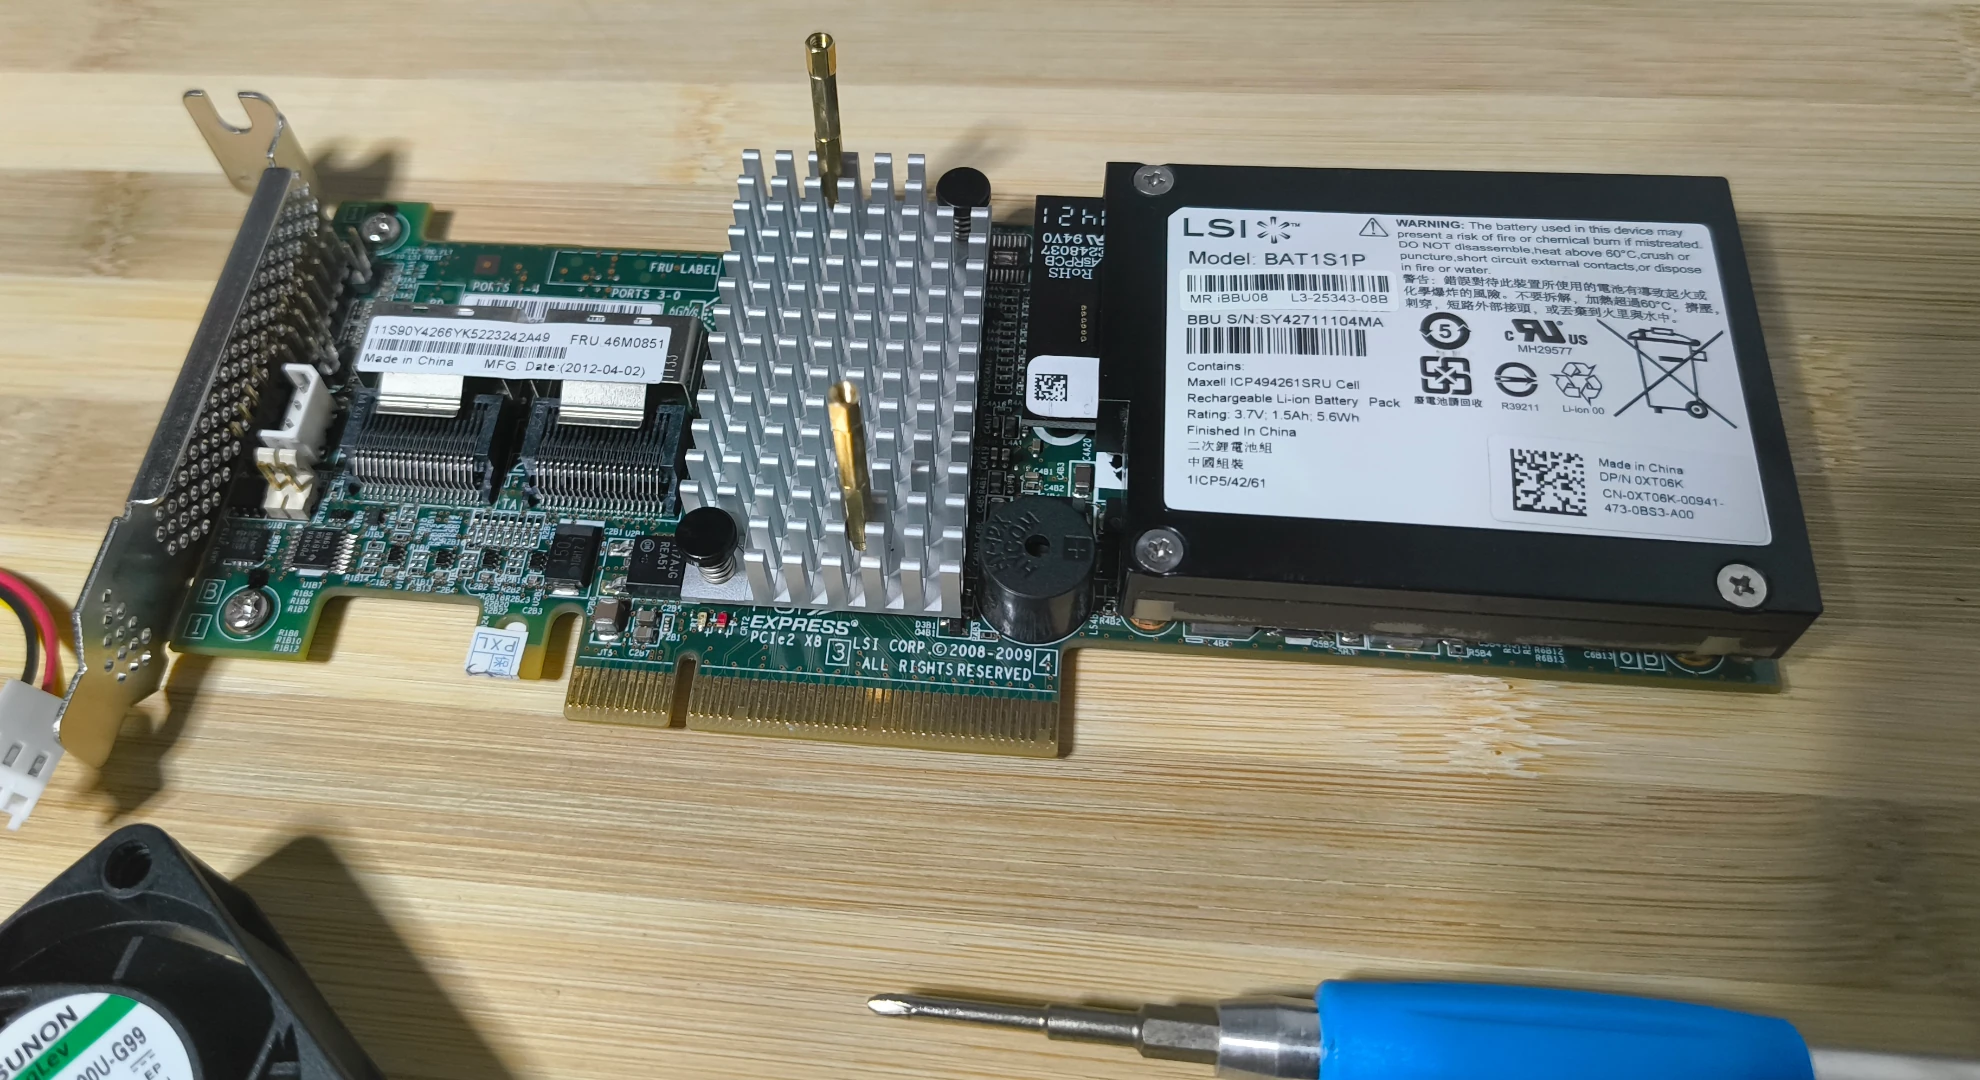
On this section we will install the LSI MegaRAID SAS 9260-8i card to the fujitsu.
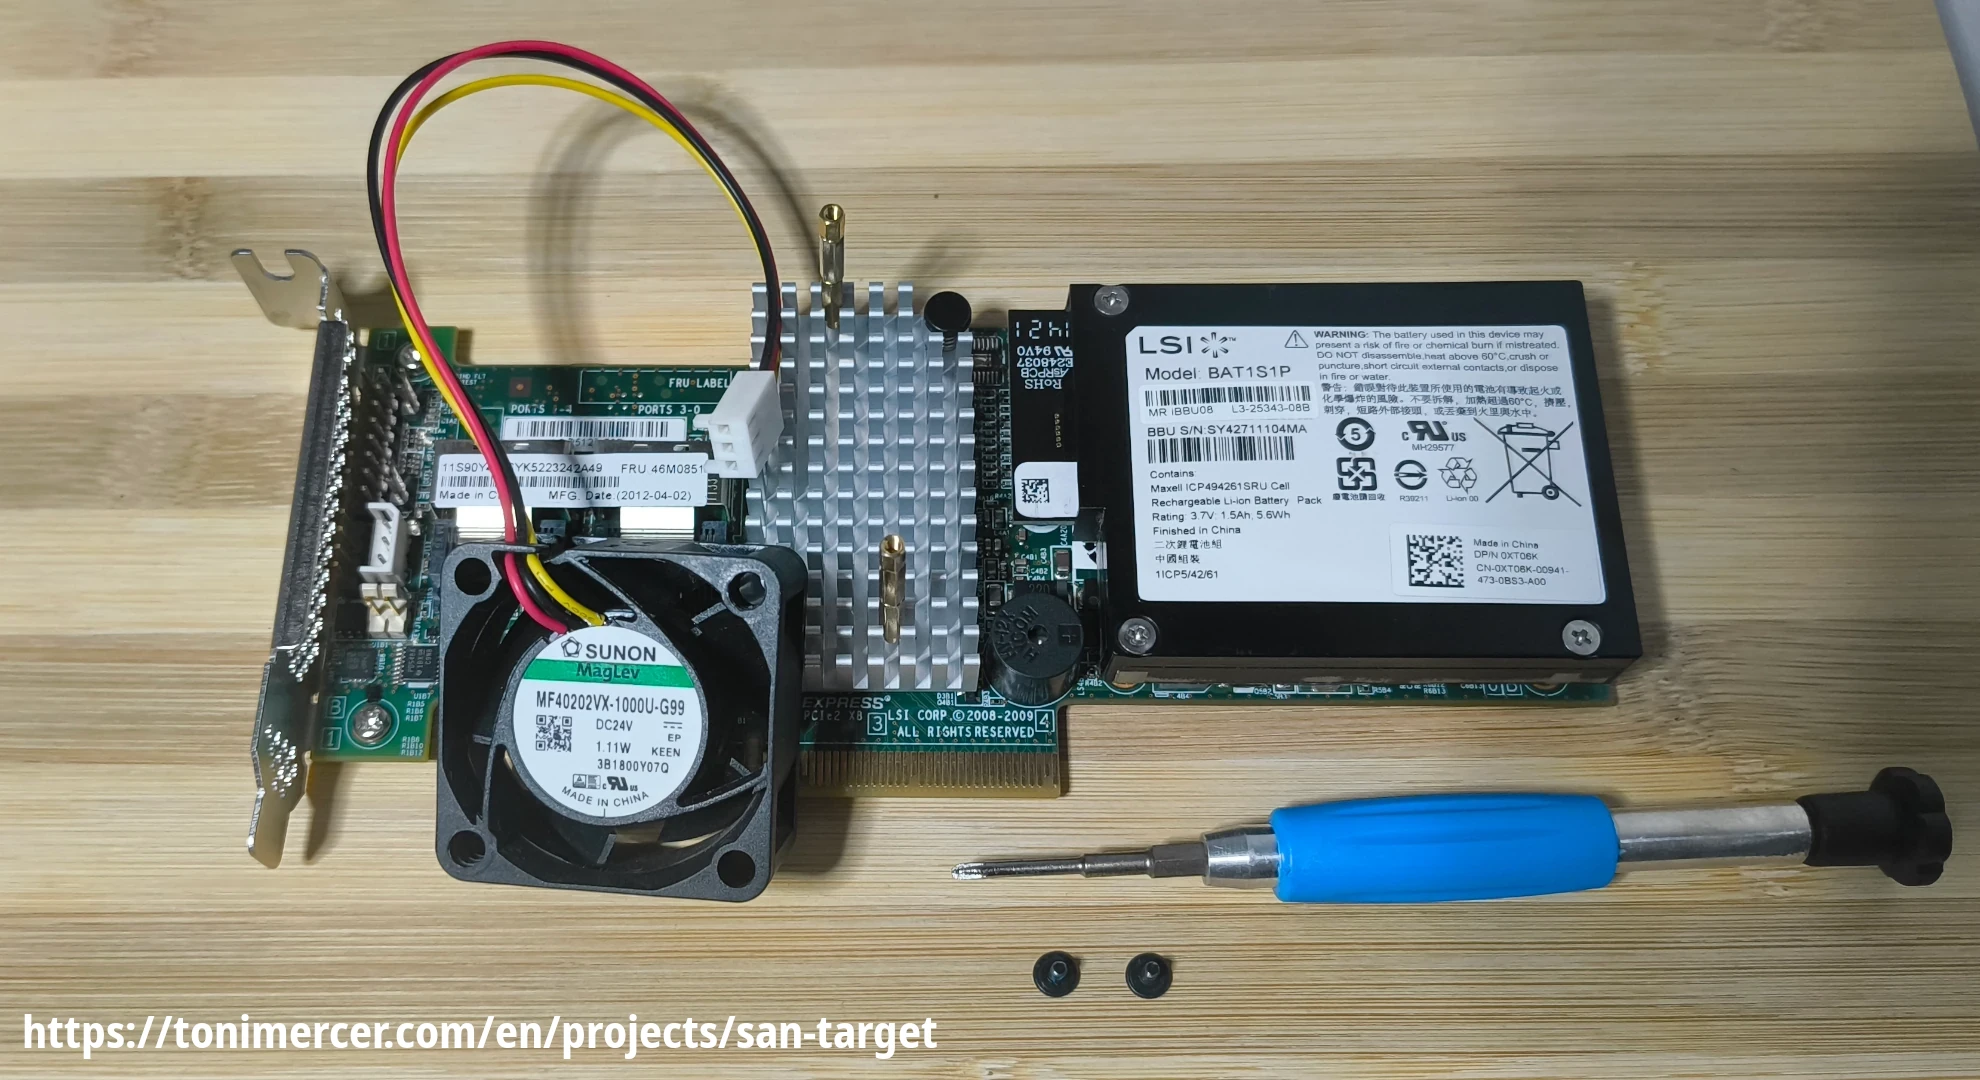
With the help of spacing screws and some bolts extracted from old laptops, the fan can be attached to the heat-sink to help disipate the heat of the controller.
This controller comes with two Mini-SAS SFF-8087 and will require two adapters to SFF-8087 to 4 SATA connectors. Additionally, it comes with 512MB 800MHz DDR II SD-RAM of cache memory and a battery (iBBU08) that allows up to 12–24H of data retention depending on the temperature in a power loss event.
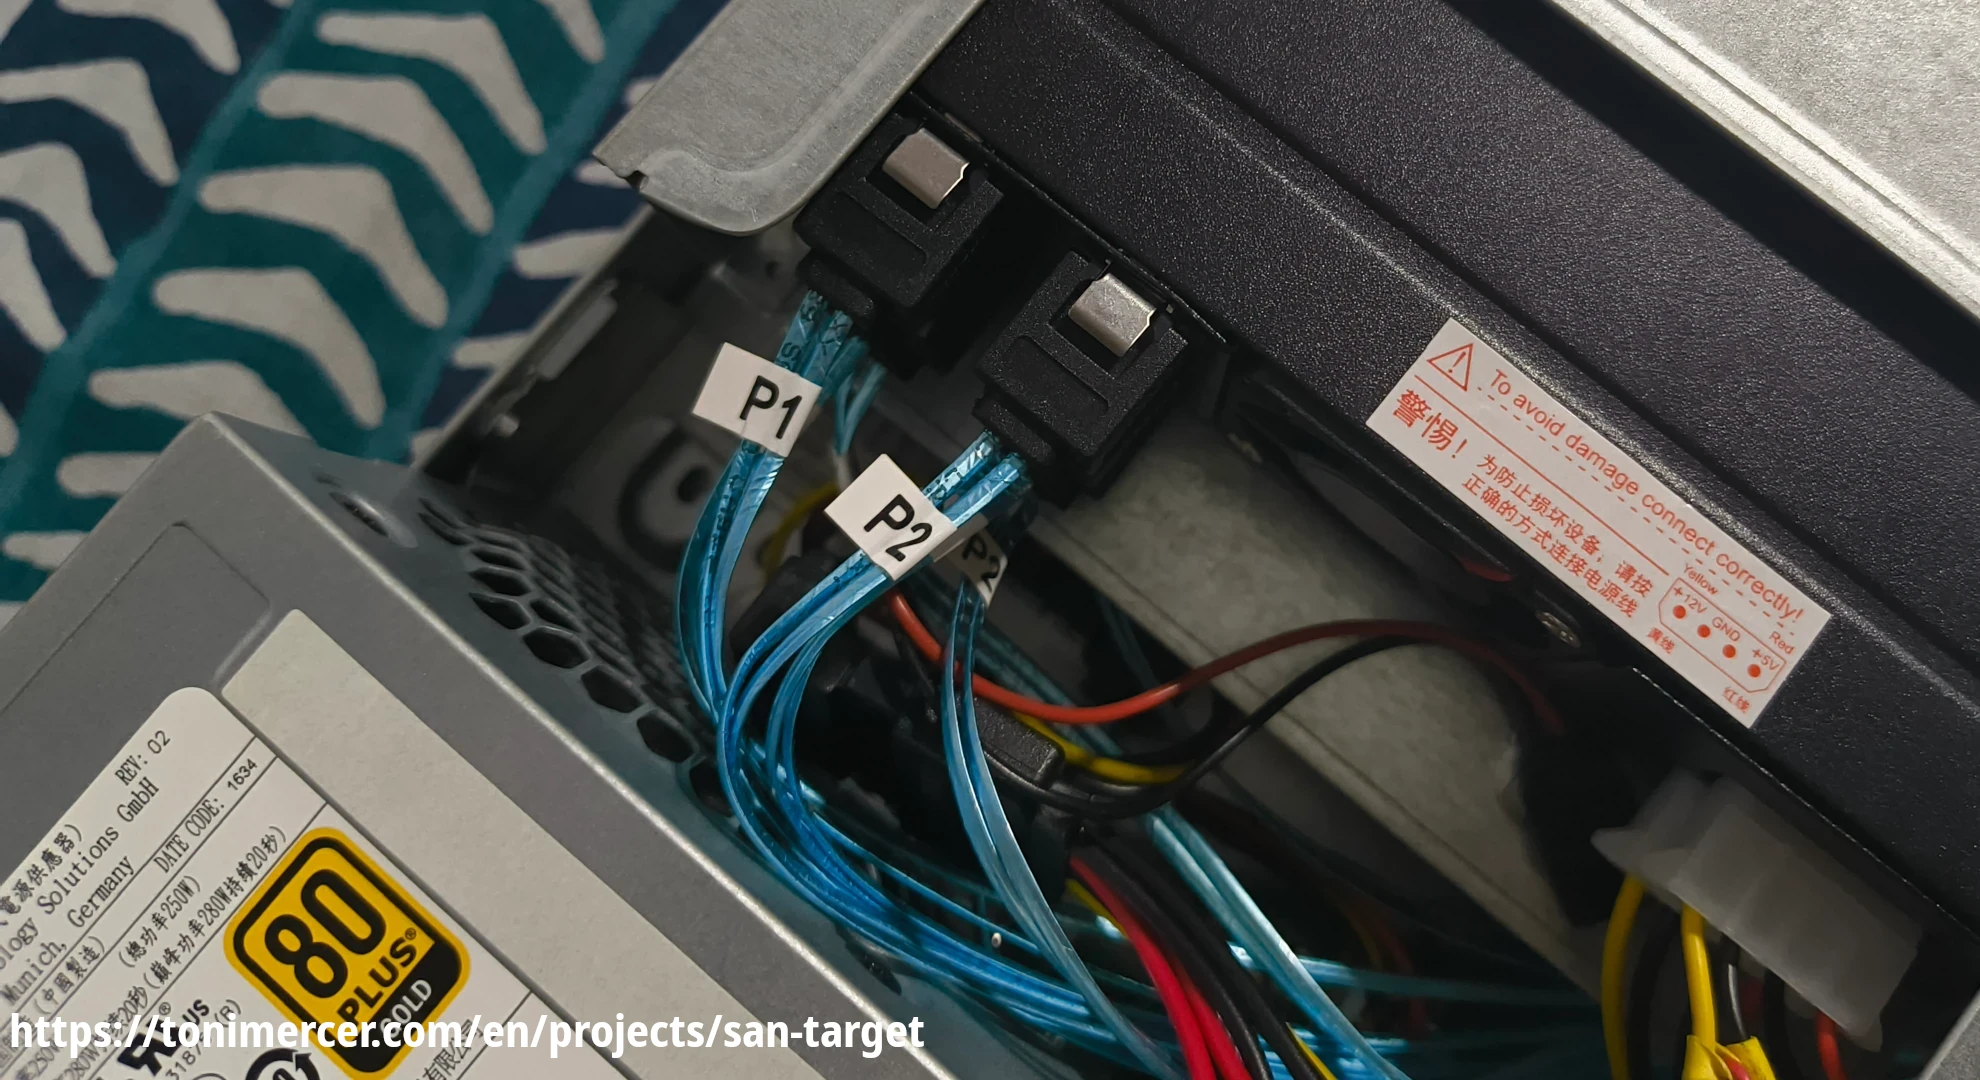
To correctly connect the Mini-SAS cable to the hot-swap disk shelf, refer to the installation guide to verify the port order. In this setup, the right port corresponds to disks 0 through 3, and the left port to disks 4 through 7. The Mini-SAS cable will be labeled with P1, P2, P3, and P4, helping you track the disk order in relation to the shelf. This ensures proper organization and easy identification of the disks.
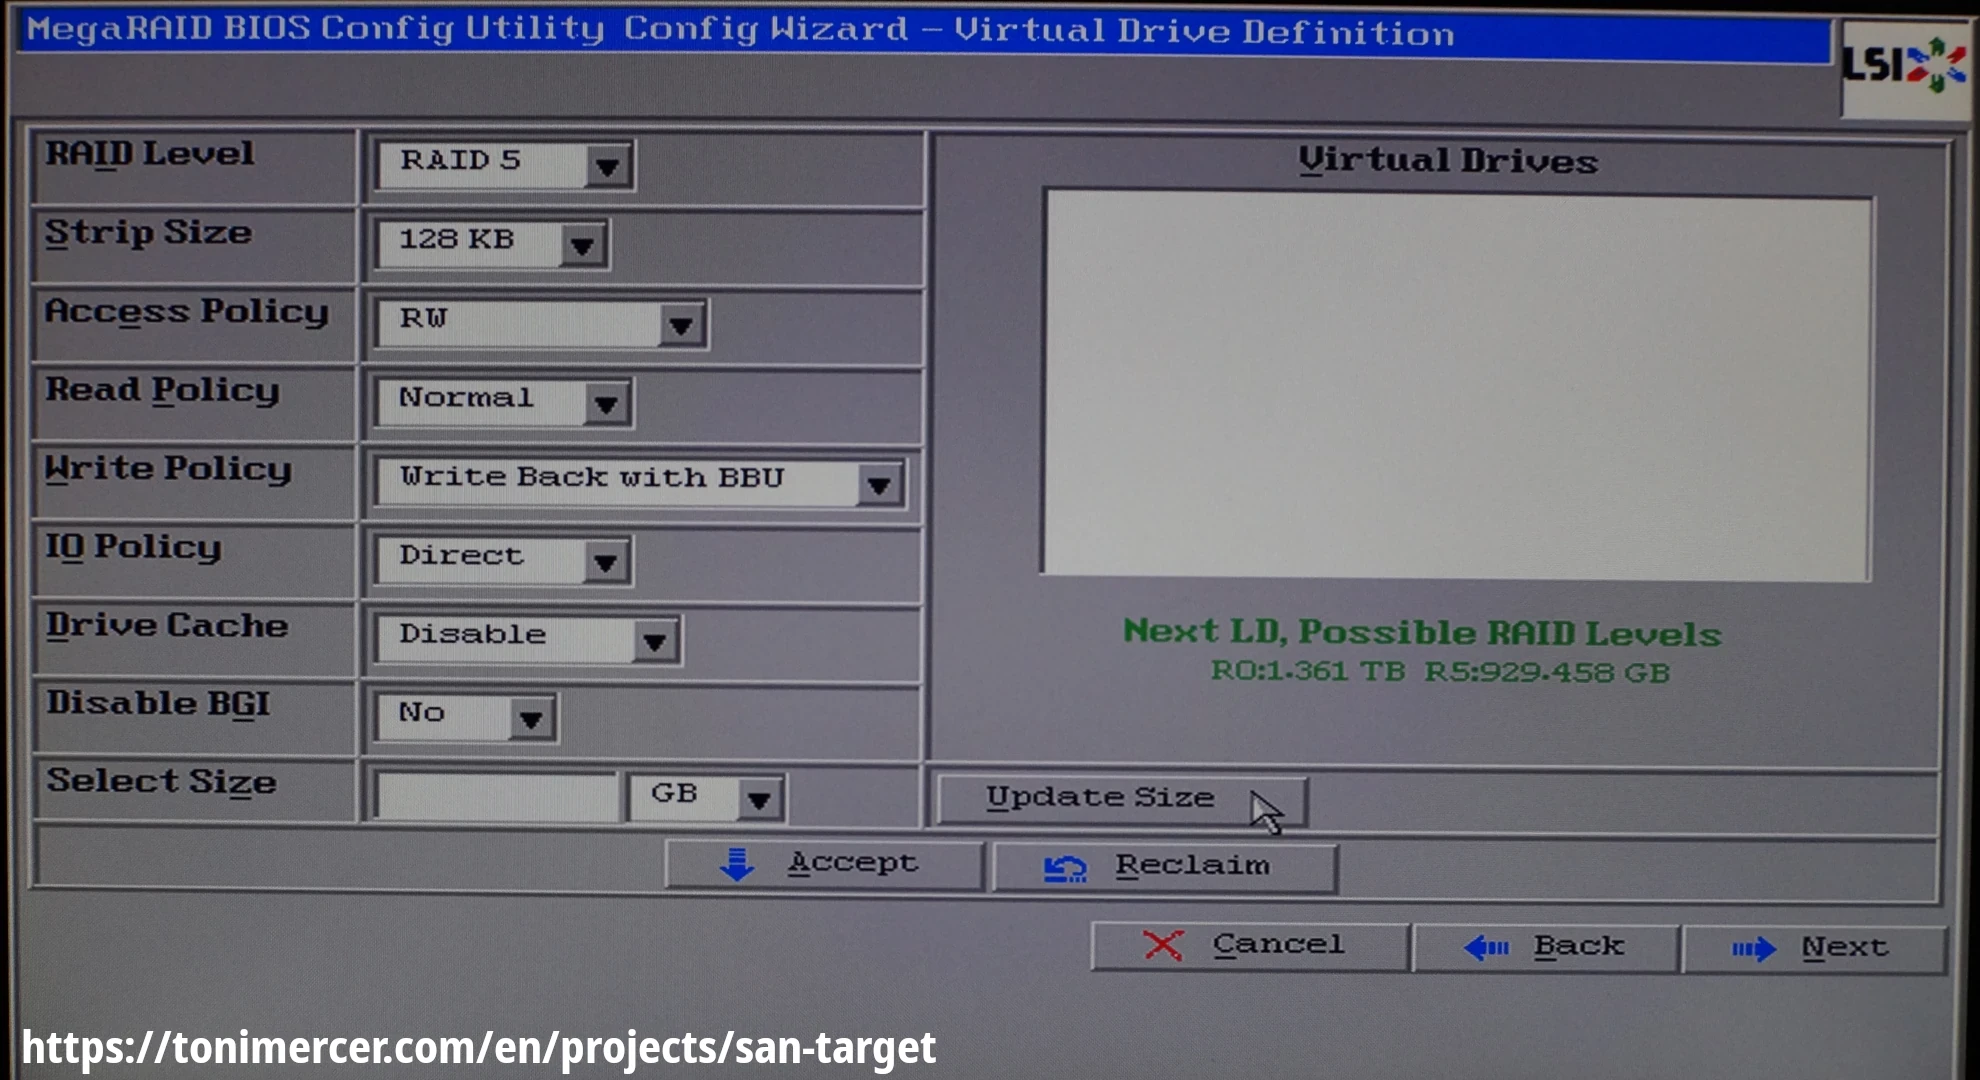
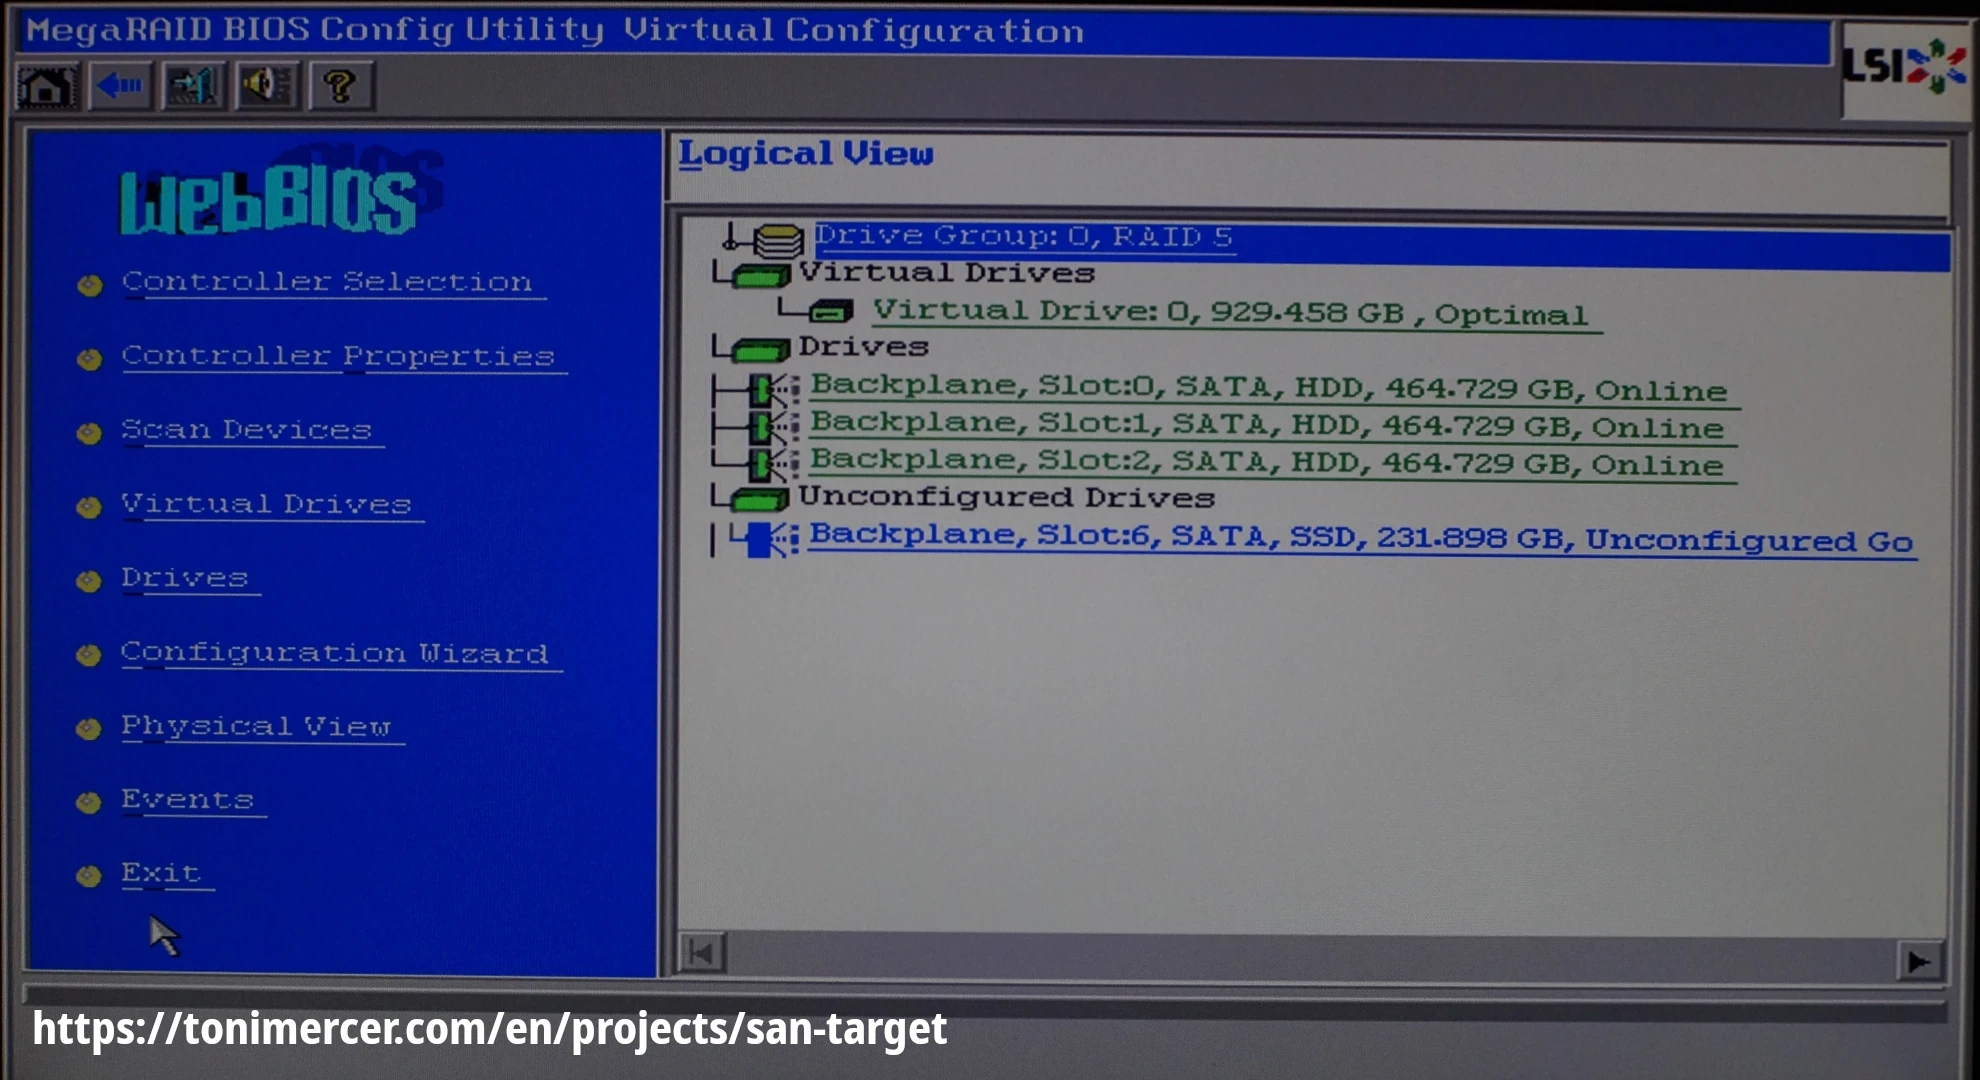
The image above shows a RAID 5 managed by the LSI card. Arround ~930GB has been created with 3 Toshiba disks of 500GB each.
fdisk -l
Disk /dev/sda: 929.46 GiB, 997998985216 bytes, 1949216768 sectors
Disk model: ServeRAID M5015
Units: sectors of 1 * 512 = 512 bytes
Sector size (logical/physical): 512 bytes / 512 bytes
I/O size (minimum/optimal): 512 bytes / 512 bytes
Listing on eBay of the LSI card can be found here and a screenshot for archival reasons can be found here.
Listing on SFF-8087 to 4-SATA cables can be found here and a screenshot for archival reasons can be found here.
The fan model is MF40202VX-1000U-G99 and has been obtained from recycling broken hardware. The datasheet can be found here
The Total cost was 37.09 Euros, 24.05 for the LSI card and 13.04 for the two Mini-SAS SFF-8087 To 4 SATA cables. Both products had free shipping to my address.
LUNs setup
To expose the disks at a block level, we have to install targetcli.
For this setup, we will expose the entire disk.
apt install targetcli-fbtargetcli is an interactive shell used to manage the SCSI targets, LUNs and ACLs between others.
The GitHub repository can be found here and the documentation can be found here (documentation does not work at the moment of writing this guide).
Warning: Could not load preferences file /root/.targetcli/prefs.bin.
targetcli shell version 2.1.53
Copyright 2011-2013 by Datera, Inc and others.
For help on commands, type 'help'.

/>
With ls we can see all the options available
/> ls
o- / ............................................................................................ [...]
  o- backstores ................................................................................. [...]
  | o- block ..................................................................... [Storage Objects: 0]
  | o- fileio .................................................................... [Storage Objects: 0]
  | o- pscsi ..................................................................... [Storage Objects: 0]
  | o- ramdisk ................................................................... [Storage Objects: 0]
  o- iscsi ............................................................................... [Targets: 0]
  o- loopback ............................................................................ [Targets: 0]
  o- qla2xxx ............................................................................. [Targets: 0]
  o- vhost ............................................................................... [Targets: 0]
  o- xen-pvscsi .......................................................................... [Targets: 0]
To get the info of the connected QLE2560 card run qla2xxx/ info
/> qla2xxx/ info
Fabric module name: qla2xxx
ConfigFS path: /sys/kernel/config/target/qla2xxx
Allowed WWN types: naa
Allowed WWNs list: naa.21000024ff10d45c
Fabric module features: acls
Corresponding kernel module: tcm_qla2xxx
Now, to create a target use qla2xxx/ create naa.21000024ff10d45c
The naa.21000024ff10d45c has been obtained from the HBA adapter before installing it, or with the info command.
/> qla2xxx/ create naa.21000024ff10d45c
Created target naa.21000024ff10d45c.
For this guide a block storage object identified as LUN0 will be created and point tho the virtual array /dev/sda created with the LSI card. This will be done using the following command: backstores/block create lun0 /dev/sda
/> backstores/block create lun0 /dev/sda
Created block storage object lun0 using /dev/sda.
Create a new LUN for the interface, attached to a previously defined storage object. The storage object now shows up under the /backstores configuration node as activated.
/> ls
o- / ............................................................................................ [...]
  o- backstores ................................................................................. [...]
  | o- block ..................................................................... [Storage Objects: 1]
  | | o- lun0 ............................................ [/dev/sda (929.5GiB) write-thru deactivated]
  | |   o- alua ...................................................................... [ALUA Groups: 1]
  | |     o- default_tg_pt_gp .......................................... [ALUA state: Active/optimized]
  | o- fileio .................................................................... [Storage Objects: 0]
  | o- pscsi ..................................................................... [Storage Objects: 0]
  | o- ramdisk ................................................................... [Storage Objects: 0]
  o- iscsi ............................................................................... [Targets: 0]
  o- loopback ............................................................................ [Targets: 0]
  o- qla2xxx ............................................................................. [Targets: 1]
  | o- naa.21000024ff10d45c ................................................................ [gen-acls]
  |   o- acls ............................................................................... [ACLs: 0]
  |   o- luns ............................................................................... [LUNs: 0]
  o- vhost ............................................................................... [Targets: 0]
  o- xen-pvscsi .......................................................................... [Targets: 0]
To create the new LUN for the qla2xxx target use the following command: qla2xxx/naa.210000e08b943494/luns create /backstores/block/lun0
/> qla2xxx/naa.21000024ff10d45c/luns create /backstores/block/lun0
Created LUN 0.
Now, create an ACL (Access Control List) to define the resources each initiator can access. The default behavior is to auto-map existing LUNs to the ACL.
Use the command qla2xxx/naa.21000024ff10d45c/acls create XXXX where XXXX is the initiator's WWN. This will prevent other initiators from accessing the LUN. If the lun0 filesystem does not support clustering, having multiple HBAa accessing the same LUN will result in data loss and critical failure.
/> qla2xxx/naa.21000024ff10d45c/acls create 21000024ff10d508
Created Node ACL for naa.21000024ff10d508
Created mapped LUN 0.
Use ls command to see the final configuration
/> ls
o- / ............................................................................................ [...]
  o- backstores ................................................................................. [...]
  | o- block ..................................................................... [Storage Objects: 1]
  | | o- lun0 .............................................. [/dev/sda (929.5GiB) write-thru activated]
  | |   o- alua ...................................................................... [ALUA Groups: 1]
  | |     o- default_tg_pt_gp .......................................... [ALUA state: Active/optimized]
  | o- fileio .................................................................... [Storage Objects: 0]
  | o- pscsi ..................................................................... [Storage Objects: 0]
  | o- ramdisk ................................................................... [Storage Objects: 0]
  o- iscsi ............................................................................... [Targets: 0]
  o- loopback ............................................................................ [Targets: 0]
  o- qla2xxx ............................................................................. [Targets: 1]
  | o- naa.21000024ff10d45c ................................................................ [gen-acls]
  |   o- acls ............................................................................... [ACLs: 1]
  |   | o- naa.21000024ff10d508 ...................................................... [Mapped LUNs: 1]
  |   |   o- mapped_lun0 ....................................................... [lun0 block/lun0 (rw)]
  |   o- luns ............................................................................... [LUNs: 1]
  |     o- lun0 ............................................ [block/lun0 (/dev/sda) (default_tg_pt_gp)]
  o- vhost ............................................................................... [Targets: 0]
  o- xen-pvscsi .......................................................................... [Targets: 0]
Finally, save using saveconfig command.
/> saveconfig
Configuration saved to /etc/rtslib-fb-target/saveconfig.json
Use exit to exit targetcli command line.
Initiator
Once the fiber cable of the initiator is plugged to the target (Point to Point Architecture), a bus reset must be launched. This will scan the interconnect and will cause device addition or removal.
Use the command echo 1 > /sys/class/fc_host/hostN/issue_lip replacing hostN with the host number of your system.
echo 1 > /sys/class/fc_host/host8/issue_lipNow, by using the dmesg command, you can verify that the operation was successful. The new disk will be visible by running fdisk -l.
[   75.037265] qla2xxx [0000:04:00.0]-500a:8: LOOP UP detected (8 Gbps).
[  177.851132] Rounding down aligned max_sectors from 4294967295 to 4294967288
[  177.851188] db_root: cannot open: /etc/target
[ 1508.390714] scsi 8:0:0:0: Direct-Access     LIO-ORG  lun0             4.0  PQ: 0 ANSI: 6
[ 1508.393960] sd 8:0:0:0: Attached scsi generic sg3 type 0
[ 1508.394125] sd 8:0:0:0: [sdd] 1949216768 512-byte logical blocks: (998 GB/929 GiB)
[ 1508.394210] sd 8:0:0:0: [sdd] Write Protect is off
[ 1508.394214] sd 8:0:0:0: [sdd] Mode Sense: 43 00 10 08
[ 1508.394346] sd 8:0:0:0: [sdd] Write cache: enabled, read cache: enabled, supports DPO and FUA
[ 1508.394423] sd 8:0:0:0: [sdd] Preferred minimum I/O size 512 bytes
[ 1508.394427] sd 8:0:0:0: [sdd] Optimal transfer size 327680 bytes
[ 1508.437028] sd 8:0:0:0: [sdd] Attached SCSI disk
Disk /dev/sdd: 929.46 GiB, 997998985216 bytes, 1949216768 sectors
Disk model: lun0
Units: sectors of 1 * 512 = 512 bytes
Sector size (logical/physical): 512 bytes / 512 bytes
I/O size (minimum/optimal): 512 bytes / 327680 bytes
This disk has no partitions yet.
To partition the disk use fdisk /dev/sdXX tool. Where /dev/sdXX is the path of the disk on your system.
fdisk /dev/sdd
Welcome to fdisk (util-linux 2.38.1).
Changes will remain in memory only, until you decide to write them.
Be careful before using the write command.

Device does not contain a recognized partition table.
Created a new DOS (MBR) disklabel with disk identifier 0xc639a019.

Command (m for help):  n
Partition type
   p   primary (0 primary, 0 extended, 4 free)
   e   extended (container for logical partitions)
Select (default p): p
Partition number (1-4, default 1):
First sector (2048-1949216767, default 2048):
Last sector, +/-sectors or +/-size{K,M,G,T,P} (2048-1949216767, default 1949216767):

Created a new partition 1 of type 'Linux' and of size 929.5 GiB.

Command (m for help): w
The partition table has been altered.
Calling ioctl() to re-read partition table.
Syncing disks.
Now the new partition has to be formatted using mkfs tool. For this guide Ext4 filesystem has been selected.
mkfs.ext4 /dev/sdd1
mke2fs 1.47.0 (5-Feb-2023)
Creating filesystem with 243651840 4k blocks and 60915712 inodes
Filesystem UUID: c30ac810-eb26-492b-8c5c-1f004fa77d64
Superblock backups stored on blocks:
	32768, 98304, 163840, 229376, 294912, 819200, 884736, 1605632, 2654208,
	4096000, 7962624, 11239424, 20480000, 23887872, 71663616, 78675968,
	102400000, 214990848

Allocating group tables: done
Writing inode tables: done
Creating journal (262144 blocks): done
Writing superblocks and filesystem accounting information: done
Create a directory on the /mnt/ path called SAN_LUN0
mkdir /mnt/SAN_LUN0Finally, mount it using mount command
mount /dev/sdd1 /mnt/SAN_LUN0/For the requirements of this guide we will transfer ownership of the disk to the default user nexus in this case.
chown nexus:nexus /mnt/SAN_LUN0Performance
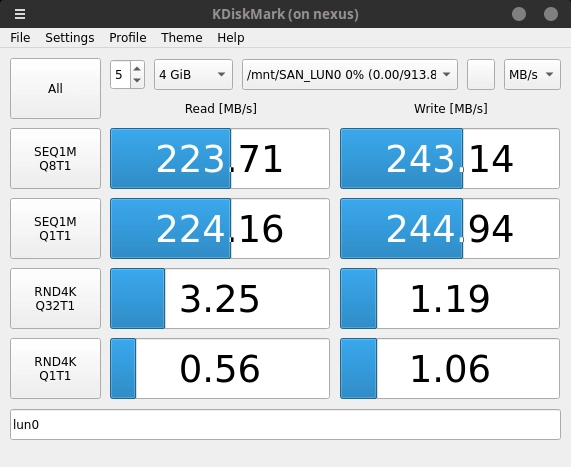
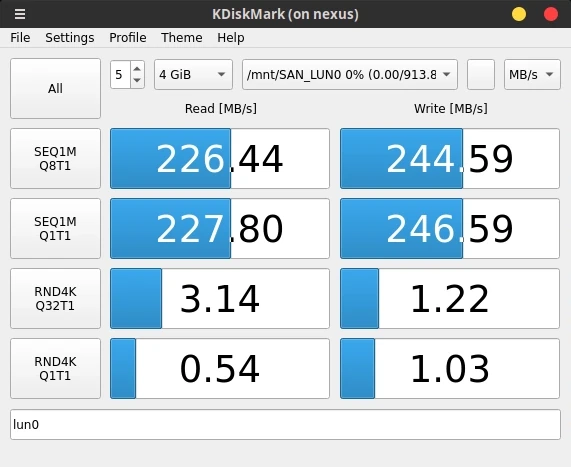
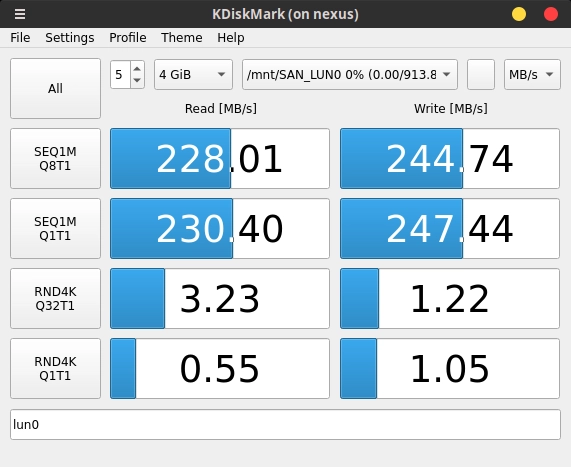
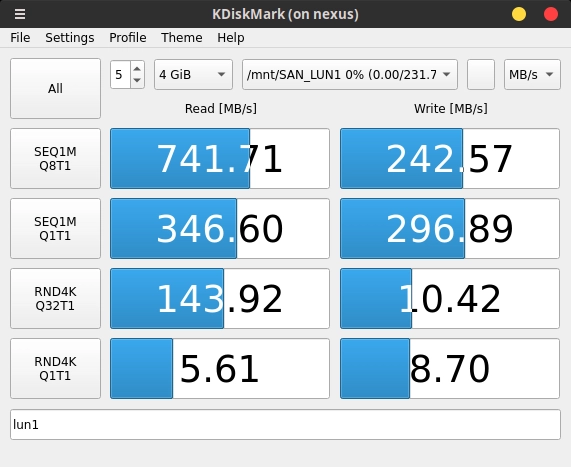
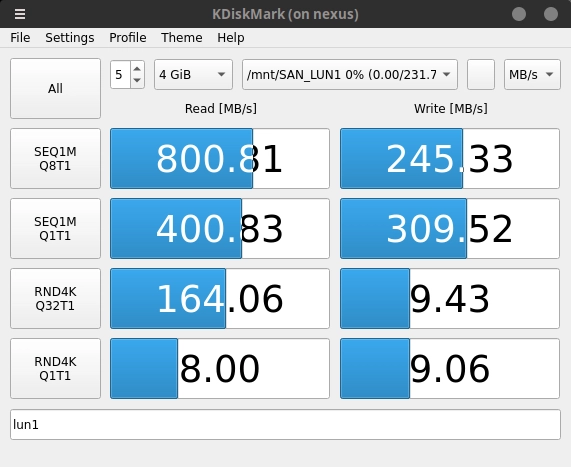
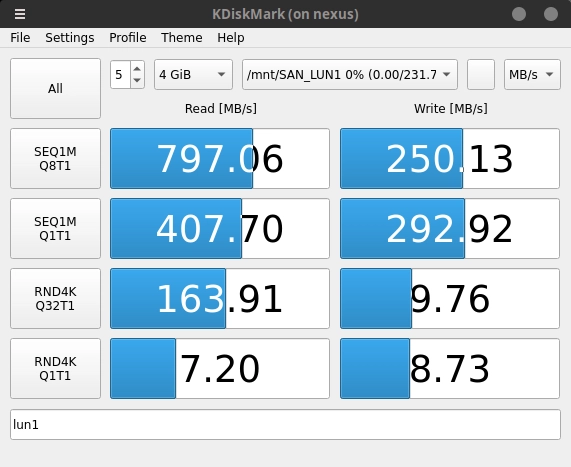
Now the FC SAN is set it is time to test the performance on RAID 5 with three HDDs and three SSDs respectively.
4 GiB files has been chosen to exhaust the LSI cache and avoid be performing test on the cache itself.
If you would like to see other performance comparisons contact me at antonimercer@lthjournal.com
Performance comparison
With bots setups the idle power consumptions was 40.8 watts. During the testing, the power consumption raised to 52 watts in both setups making no power difference for SSD vs HDD. During all this runs the unit have had attached 8 Disks.
The SSD array clearly outperforms the HDD array in sequential and random read speeds. The SSDs achieve up to 775 MB/s in sequential reads with high IOPS for random operations, whereas the HDDs top out at 230 MB/s and significantly lower random IOPS. This makes SSD RAID 5 ideal for read-heavy workloads.
However, in write performance, both arrays show similar results. The SSD array achieves around 255-315 MB/s in sequential writes, while the HDD array reaches 248-253 MB/s. Despite SSDs being faster in theory, RAID 5 parity overhead narrows the gap. SSDs still have the edge in random writes, but not as significantly as expected.
Thus, while SSDs excel in read performance, both arrays are comparable in writes, likely due to RAID 5's limitations.
If you spot any typos, have questions, or need assistance with the build, feel free to contact me at: antonimercer@lthjournal.com
This guide contains no affiliate links or ads. If you'd like to support this or future projects, you can do so here:
By supporting monthly you will help me create awesome guides and improve current ones.
Hardware datasheets
Books
During the development of this project, these two books have proved to be really helpful.
While the IBM Redbooks' Introduction to Storage Area Networks does not get into the technical details, it provides an introduction to the technology and explains the associated hardware. It begins at a very basic level by presenting the problems that SAN networks address and the various options for storage connectivity. This book will give you an understanding of what this project aims to solve, while Storage Area Network Essentials delves deeper into the specifics of constructing one.

Storage Area Network Essentials: A Complete Guide... by Barker, Richard and Massiglia, Paul
Gallery
Technologies used
LSI MegaRAID SAS 9260-8i, Fujitsu Esprimo D756, Finisar FTLF8528P3BCV-QL, Qlogic QLE2560, OImaster 2.5" eclosure
